I know that pictures of different organisers are always popular and I know people love sharing pictures of their latest set up or new purchases.
I’ve been a keen photographer for a number of years and since I started blogging on Philofaxy I’ve been trying to improve my own techniques to take better pictures of my organisers. So here are some tips on how to take better pictures.
Firstly Filofax organisers aren’t the easiest subjects to take photographs of, sure they stay still when you tell them to, but they are relatively small, so in normal circumstances you will be quite close to your subject.
So my first tip, try to use natural light were possible, either next to a sunny window or like I often do, on a table outside. What ever camera you use the more natural the light, then there will be quite an improvement in your pictures. With indoor lighting or with flash your camera has to try to make up for the lack of light and so on digital pictures they will look noisy and also they will look quite flat and lack sharpness.
Try to use a plain background, it doesn’t have to be anything expensive, a coloured bed sheet or cushion is fine or may be a cork notice board or similar. Something that isn’t going to clash colour wise with the subject or distract the reader. I use a variety of things this one is stood on a spare floor tile to provide a reflection.

Try to take pictures from different angles, or zoom in on a particular feature or part of the design like I did with this shot:

I often crop my photos afterwards on the computer, but I don’t change many settings just crop and save with most of them. It gets rid of wasted space in the photograph and concentrate on the Filofax not the surroundings.
If your camera lens can take filters, try fitting a polarising filter to your lens, I’ve found this can reduce the ‘glare’ you get off the shiny surface of the leather organiser and it then brings out the natural colour of the leather.
When you are taking photographs of the interior of your Filofax to show off your inserts, try to show them with some content on the pages, even if you have to create some ‘dummy’ entries, which I will hold my hand up to doing before now!!
Even if you only need two or three pictures for your blog post, take plenty of pictures, it’s far easier to discard them at a later date after you have written your post than to have to set it all up again, like I had to do once. I took a series of pictures, took all the organisers inside and then noticed another one sat on the table…. ‘Doh’ back outside again start again!
The more pictures you take the better your technique becomes anyway, so try varying the camera position and angle, stand back a little and zoom in. Small changes can make quite a difference some times.
In full sunlight be careful where you stand as you don’t cast a shadow across the subject.
Sometimes you have to do some quite clever techniques, like joining several photos together.
So here is the set up for my ‘Collection’ photo, as you can see the background doesn’t reach around the full width.
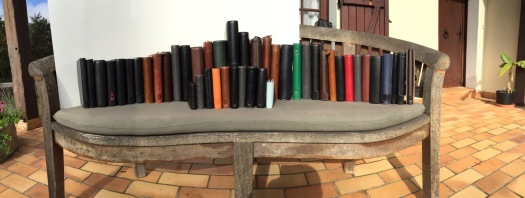
So I take a couple of photos at different positions, then as the camera turns I moved the background around. Then I stitch the 4 or 5 photos together and here is the result. I need to do an update, that one was taken in 2014!

If you have any questions please leave a comment and I will get back to you.
So it is now time to take the lens cap off and try taking some more pictures… enjoy.
Steve Morton http://philofaxy.com and http://travellersnotebooktimes.com